Get Started
This short tutorial will teach you the basics of using the Streaming Speech-to-Text API. It demonstrates how to produce a transcript of an audio stream in real-time using the Node SDK.
attention
This tutorial uses Node but SDKs and code samples are also available for other programming languages, including Java and Python.
Assumptions
This tutorial assumes that:
- You have a Rev AI account. If not, sign up for a free account .
- You have a properly configured Node development environment with a current version of Node. The Node SDK supports v8, v10, v12, v14, v16 and v17.
Step 1: Get your access token
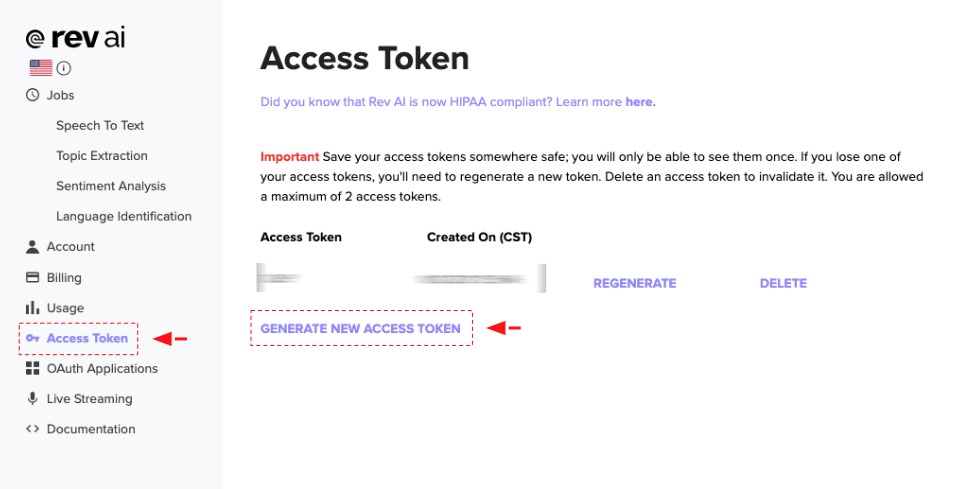
The first step is to generate an access token, which will enable access to the Rev AI APIs. Follow these steps:
- Log in to Rev AI.
- Navigate to the Access Token page .
- Click the Generate New Access Token link. Confirm the operation in the pop-up dialog box.

The new access token will be generated and displayed on the screen.
warning
Save your access tokens somewhere safe; you will only be able to see them once. You are allowed a maximum of 2 access tokens at a time.
Step 2: Install the SDK
Install the Node SDK:
npm install revai-node-sdkStep 3: Submit an audio stream for transcription and retrieve the result
The following example can be used to configure a streaming client, stream audio from a file, and obtain the transcript as the audio is processed.
To use this example, replace the <FILEPATH> placeholder with the path to the file you wish to transcribe and the <REVAI_ACCESS_TOKEN> placeholder with your Rev AI account's access token.
const revai = require('revai-node-sdk');
const fs = require('fs');

const token = '<REVAI_ACCESS_TOKEN>';
const filePath = '<FILEPATH>';

// Initialize your client with your audio configuration and access token
const audioConfig = new revai.AudioConfig(
    /* contentType */ "audio/x-raw",
    /* layout */      "interleaved",
    /* sample rate */ 16000,
    /* format */      "S16LE",
    /* channels */    1
);

var client = new revai.RevAiStreamingClient(token, audioConfig);

// Create your event responses
client.on('close', (code, reason) => {
    console.log(`Connection closed, ${code}: ${reason}`);
});
client.on('httpResponse', code => {
    console.log(`Streaming client received http response with code: ${code}`);
})
client.on('connectFailed', error => {
    console.log(`Connection failed with error: ${error}`);
})
client.on('connect', connectionMessage => {
    console.log(`Connected with message: ${connectionMessage}`);
})

// Begin streaming session
var stream = client.start();

// Read file from disk
var file = fs.createReadStream(filePath);

stream.on('data', data => {
    console.log(data);
});
stream.on('end', function () {
    console.log("End of Stream");
});

file.on('end', () => {
    client.end();
});

// Stream the file
file.pipe(stream);

// Forcibly ends the streaming session
// stream.end();
The text output is a string containing just the text of your transcript. The object form of the transcript contains all the information outlined in the response of the Get Transcript endpoint when using the JSON response schema.
Any of these outputs can also be retrieved as a stream for easy file writing:
var textStream = await client.getTranscriptTextStream(job.id);
var transcriptStream = await client.getTranscriptObjectStream(job.id);
Next steps
You should now have a basic idea of how to use the Streaming Speech-to-Text API. To learn more, read the API documentation for complete details on the different resources and operations available in this API. You can also read about our other APIs and find code samples and SDK documentation that will help you connect your application with the API.