Get Started
This short tutorial will teach you the basics of using the Custom Vocabulary API. It demonstrates how to improve the accuracy of your transcript by creating custom vocabulary to include with your transcription job request.
attention
Use custom vocabulary when your audio contains domain-specific words or phrases that may not be in our dictionary. Custom vocabularies are supported in the Asynchronous Speech-to-Text API and the Streaming Speech-to-Text API.
Assumptions
This tutorial assumes that you have a Rev AI account. If not, sign up for a free account.
Step 1: Get your access token
The first step is to generate an access token, which will enable access to the Rev AI APIs. Follow these steps:
- Log in to Rev AI.
- Navigate to the Access Token page .
- Click the Generate New Access Token link. Confirm the operation in the pop-up dialog box.
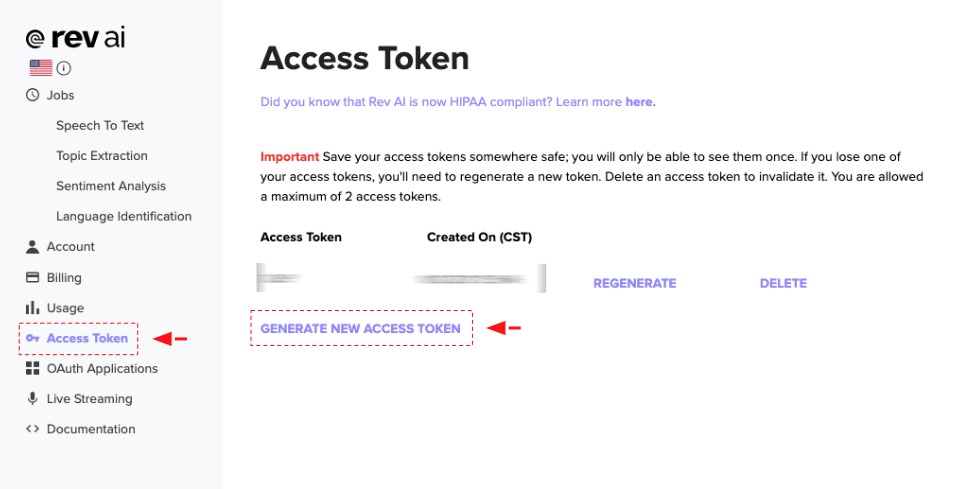
The new access token will be generated and displayed on the screen.
warning
Save your access tokens somewhere safe; you will only be able to see them once. You are allowed a maximum of 2 access tokens at a time.
Step 2: Create custom vocabulary
As an example, assume that you need a transcript of a podcast titled "A Sparkletini A Day Keeps the Linguist Away". The word "sparkletini" is a made-up word which does not exist in a standard dictionary. However, the podcast audio is likely to contain many references to this word and the transcript accuracy will therefore be significantly enhanced by adding it as custom vocabulary.
Submit the custom vocabulary request using the command below. Replace the <REVAI_ACCESS_TOKEN> placeholder with the access token obtained in Step 1.
curl -X POST "https://api.rev.ai/speechtotext/v1/vocabularies" \
    -H "Authorization: Bearer <REVAI_ACCESS_TOKEN>" \
    -H "Content-Type: application/json" \
    -d '{ "custom_vocabularies": [{ "phrases": ["sparkletini"] }] }'
You'll receive a response like this:
{
  "id":"cv6Y4Qm2kkv1Ie",
  "created_on":"2022-02-03T13:55:27.896Z",
  "status":"in_progress"
}
The id (in this case cv6Y4Qm2kkv1Ie) represents the custom vocabulary and can be attached to subsequent transcription requests.
You can poll for the status of your request by querying the API periodically. Replace the <ID> placeholder with the id obtained previously.
curl -X GET "https://api.rev.ai/speechtotext/v1/vocabularies/<ID>" \
     -H "Authorization: Bearer REVAI_ACCESS_TOKEN"
warning
Polling is NOT recommended in a production server. Rather, use webhooks to asynchronously receive notifications once the request completes.
Once the status field of the response changes to complete, proceed to the next step.
Step 3: Submit a file for transcription
Submit an audio file for transcription to Rev AI using the command below. Replace the <REVAI_ACCESS_TOKEN> placeholder with the access token obtained in Step 1, the <URL> placeholder with the direct URL to your audio file and the <CV_ID> placeholder with the id obtained in Step 2.
curl -X POST "https://api.rev.ai/speechtotext/v1/jobs" \
     -H "Authorization: Bearer <REVAI_ACCESS_TOKEN>" \
     -H "Content-Type: application/json" \
     -d '{"source_config": {"url": "<URL>"},"metadata":"This is a test","custom_vocabulary_id":"<CV_ID>"}'
You'll receive a response like this:
{
  "id":"AieBFJn8NBVm",
  "created_on":"2022-02-03T13:59:44.473Z",
  "name":"FTC_Sample_1.mp3",
  "metadata":"This is a test",
  "status":"in_progress",
  "type":"async",
  "custom_vocabulary_id":"cv6Y4Qm2kkv1Ie",
  "language":"en"
}
The id (in this case AieBFJn8NBVm) will enable you to retrieve your transcript.
Step 4: Retrieve the transcript
You now need to wait for the job to complete. Wait for approximately 1 minute and then check the status of your job by querying the API as shown below:
curl -X GET "https://api.rev.ai/speechtotext/v1/jobs/<ID>" \
     -H "Authorization: Bearer <REVAI_ACCESS_TOKEN>"
warning
Polling is NOT recommended in a production server. Rather, use webhooks to asynchronously receive notifications once the transcription job completes.
Once a transcription job's status changes to transcribed, you can retrieve the transcript in JSON format by running the command below. As before, replace the <REVAI_ACCESS_TOKEN> placeholder with the access token obtained in Step 1. You must also replace the <ID> placeholder with the id obtained in Step 3.
curl -X GET "https://api.rev.ai/speechtotext/v1/jobs/<ID>/transcript" \
     -H "Authorization: Bearer <REVAI_ACCESS_TOKEN>" \
     -H "Accept: application/vnd.rev.transcript.v1.0+json"
Here is an example of the output:
{
  "monologues": [
    {
      "speaker": 1,
      "elements": [
        {
          ...
        },
        {
          "type": "text",
          "value": "make",
          "ts": 4.29,
          "end_ts": 4.71,
          "confidence": 1
        },
        {
          "type": "punct",
          "value": " "
        },
        {
          "type": "text",
          "value": "a",
          "ts": 4.74,
          "end_ts": 4.8,
          "confidence": 1
        },
        {
          "type": "punct",
          "value": " "
        },
        {
          "type": "text",
          "value": "sparkletini",
          "ts": 4.88,
          "end_ts": 5.22,
          "confidence": 1
        },
        {
          ...
        }
      ]
    },
    {
      ...
    }
  ]
}
Alternatively, you can get the plaintext version by running the command below:
curl -X GET "https://api.rev.ai/speechtotext/v1/jobs/<ID>/transcript" \
     -H "Authorization: Bearer <REVAI_ACCESS_TOKEN>" \
     -H "Accept: text/plain"
Next steps
You should now have a basic idea of how to use the Custom Vocabulary API. To learn more, read the API documentation for complete details on the different resources and operations available in this API. You can also read about our other APIs and find code samples and SDK documentation that will help you connect your application with the API.